systemd Service for the FFmpeg Script systemd Service for the Metadata Update Script < Prev. |
Next > |
Prerequisites ![]() The
FFmpeg Script
The
FFmpeg Script ![]() The
Metadata Update Script
The
Metadata Update Script ![]() Make
Both Scripts Executable
Make
Both Scripts Executable ![]() Create
a
Create
a systemd Service for the FFmpeg Script ![]() Create
a
Create
a systemd Service for the Metadata Update Script ![]() Explanation
of the Daemon Services
Explanation
of the Daemon Services ![]() Verify the Scripts Are Running
Verify the Scripts Are Running
This was the most complex part of this project. I intended to take the radio signal and broadcast it on YouTube to a wider audience. That’s simple with an FFmpeg script. I wanted to send the metadata of the song, including the album art (a specific image) for the current song playing, and its lyrics. That seemed a piece of cake for ChatGPT and Gemini, but making it all work was another thing.
I spent a few days with different scripts that were said to make that job. Sometimes they worked, other times nothing worked at all. Troubleshooting is a difficult task, by simply believing what the AI suggests so confidently! 😊
Finally, I managed to make the script work, but with a twist: YouTube doesn’t show the image for the current song, and cannot even display a single static image for the radio station. It’s frustrating, but that’s the case.
At least, the song is heard, the screen is colored, and the metadata (Title, Author, Album, and Genre) is displayed on screen. I also tried with FFmpeg filters for gradient color, and with displaying lyrics in metadata, but that was too complicated altogether and failed.
The problem with the image doesn’t belong to the script, but to how YouTube processes the RTMP signal, because the RTMP protocol used for streaming doesn't support metadata in a standardized way. However, you can use a tool like FFmpeg to overlay this information as text on a static video image, effectively embedding the metadata visually into the stream.
In conclusion, the task is done, as you can check for yourself on YouTube. And here is how it was done.
I made two scripts, one that sends the radio signal to YouTube and the other that updates the song metadata when the song changes. I also made a service for each script that automates restarting in case of VM reboot or in case of troubleshooting.
There are a few programs that must be installed (if not already installed), which are nano (the text editor), ffmpeg, curl, jq. Use this single command that will check and install the newest versions:
Firstly, create the bin directory inside the local user
directory to put all your scripts there:
1. Get your YouTube RTMP URL and stream key
Navigate to your YouTube Studio and find in the top-right menu Create >"Go Live" section. The Stream key will be listed there in the Stream settings, in hidden characters. It looks something like this when you paste it: abcd-1234-efgh-5678-ij90
2. Get your Azuracast stream URL
In your AzuraCast dashboard, find the public URL for your audio stream. Look in Profile > Streams > Local streams. It will look like this (notice the radio's short name)
http://92.5.239.117/listen/radio_spiritus/radio.mp3
![]()
FFmpeg is the tool you'll use to take your audio stream and package it into a video format for YouTube Live. When you run the FFmpeg command, that's where the magic happens! Install FFmpeg:
start_stream.sh script If the Nano text editor isn't installed yet, install it now:
Create a new file named
start_stream.sh in the /home/ubuntu/bin directory:
Paste the code given below into the file, replacing the placeholders <MyYTurl> and <MyIP> with your own.
You may first copy/paste and edit in Notepad, for example.
If you want to edit directly inside Nano, use the arrow keys to navigate, and the Delete or Backspace key to erase characters. To delete blocks of text, use Alt+A to mark the first character and the arrow keys to select the lines and characters. Then use Ctrl+K to cut text.
Save and exit Nano (see the messages displayed): Press Ctrl+O → Enter → Ctrl+X. Or Ctrl+X → Y → Enter
NOTE: When copying/pasting from an Office Word document, be aware that some errors may occur:
- Hyphens (-) might have been changed into dashes (–).
- Blank spaces exist where they should not in a Linux script. In this example below, two blank spaces after the backslash (\) (which is a “command continues on the next line” symbol) are not allowed and therefore automatically colored in green by the Nano editor. Of course, you should delete them, or the script will not work.
Here is the start_stream.sh code. Copy this code, paste it in
Notepad or other simple text editor, replace <MyYTurl>
and <MyIP>, then paste
the whole edited script into Nano editor. (You can alternatively
replace <MyIP> with this internal URL: localhost:8000
or 127.0.0.1)
Or edit it directly into Nano. Also, replace radio_spiritus with your real short name:
Code explanation:
The first part of the script defines the configuration files.
Then comes the
FFmpeg streaming command, located in /usr/bin/ffmpeg . It’s a single long
command which is segmented here into smaller chunks with the backslash character
‘\’ for better readability.
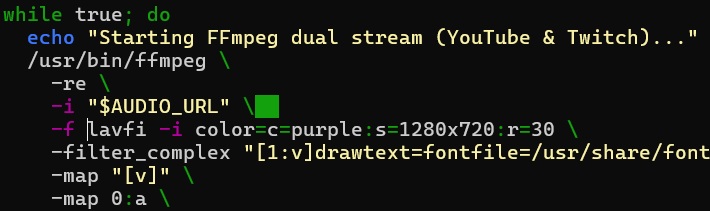
The FFmpeg command needs some flags to get the correct output.
• -re: The flag tells FFmpeg to read the input at its
native frame rate, which is important for live streaming.
• -i "...": This
specifies the input source, which is the AzuraCast audio stream.
• -f lavfi -i
color=c=purple:s=1280x720:r=30. This filter defines the color and resolution
of the background screen and the frames per second.
FFmpeg can also read from
a text file and use that information to create a text overlay on a video stream.
This is done with the drawtext filter. The -filter_complex option in FFmpeg is
used to apply multiple filters.
Command Breakdown:
fontfile=/usr/share/fonts/truetype/dejavu/DejaVuSans-Bold.ttf: Specifies the
font file to use. fontsize=48: Sets the size of the font. fontcolor=white: Sets the text color to white. box=1:boxcolor=black@0.5:
Draws a semi-transparent black box behind the text for better readability. x=10:y=(h-th)/2: Sets the position of the text to the left horizontally and to
the middle of the video. (h is the video height, th is the text height.) line_spacing=15: Adds a little space between the two lines of text. textfile=$FFMPEG_DIR/nowplaying.txt: Tells FFmpeg to read the text content from
the file nowplaying.txt located in /home/ubuntu/bin directory, which we’ll
create along with the Metadata script. That script will update the
nowplaying.txt with the metadata of the currently playing song in AzuraCast, so
that FFmpeg will always send the last updated information to YouTube. • -c:v libx264 -preset veryfast -b:v 1500k -maxrate 3000k -bufsize 3000k -g 60
-keyint_min 60
Command Breakdown:
-c:v libx264: Specifies the H.264 video
codec. This is a standard, highly compatible codec. -preset veryfast: A
speed/quality preset. It sacrifices some compression efficiency for faster
encoding speed. This is also useful for live streaming, where speed is more
important than achieving the smallest possible file size. -b:v 1500k: Sets
a target video bitrate of 1500 kilobits per second. I reached that value by
multiple trials so that the stream would be steady. • -c:a aac -b:a 128k: This
configures the audio output. aac is the audio codec, -b:a 128k sets the audio
bitrate to 128 kilobits per second. The bitrate determines the audio quality—a
higher bitrate generally means better quality, but also a larger file size.
YouTube's recommended audio bitrate for live streaming is 128 kbps.
• -f flv:
This specifies the output format, which should be FLV for RTMP streaming.
•
sleep 5: This is a safety measure built into your bash script. If the ffmpeg
command fails, but the start_stream.sh script itself keeps running, the sleep
command tells the script to wait 5 seconds before trying to run ffmpeg again.
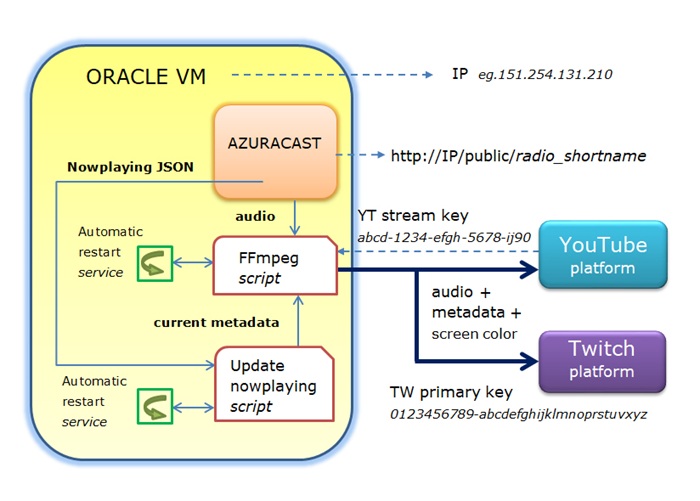
I my first VM with an Intel shape, additionally, I sent the same broadcast signal to the Twitch streaming platform. So, the same radio program was sent to both streaming platforms, with just a little modification of the FFmpeg script. You can do the same if you are a Twitch user. (Or, you can stream on a second YouTube account.)
Here are the modifications:
In the upper part of the script, add the following lines beneath the
# Replace with your YouTube stream key:
Then go to the bottom of the script and insert these lines:
just before the lines
-c:v libx264 -preset veryfast -b:v 1500k -maxrate 3000k -bufsize 3000k -g 60
-keyint_min 60 \
-pix_fmt yuv420p \
-c:a aac -b:a 128k \
-f flv
"$YOUTUBE_URL"
NOTE: Do not make these changes until after you create the youtube-relay.service(see below), which will safely restart the script.
![]()
Firstly, be sure you have curl and
jq commands installed on your system:
Then
create a text file called nowplaying.txt in /home/ubuntu :
update_nowplaying.sh script and paste the following code inside. Then Save and exit Nano: Press Ctrl+O → Enter → Ctrl+X. Or Ctrl+X → Y → Enter.
If you already have a valid SSL certificate, using
https://radio.spiritus.ro is the most reliable way to connect. If you
use the IP address with https, your script might throw a "Certificate Mismatch"
error because the SSL certificate is issued to the domain, not the IP. But if
you do not have SSL, simply replace <MyIP> with your real IP.
Code explanation:
Use curl to get the "Now Playing"
information from AzuraCast's API. This will output a block of JSON data related
to the current playing song. This info is piped to a plain text file using jq (a
command-line JSON processor).
The script verifies if the song ID has changed
and writes the relevant metadata (artist, title, genre, album) to
/home/ubuntu/nowplaying.txt file.
The drawtext FFmpeg filter will take it
from there and burn the data into the video stream sent to YouTube.
To understand what the JSON file looks like, try this command, replacing 158.101.212.51 with your real IP:
This command gets the complete
JSON object from the AzuraCast API, and the jq program displays it in a nice
format. The whole JSON file contains data about: the radio station, the now
playing song, the next song, and the song history.
Here is an excerpt only showing the now-playing song data:
From this bigger JSON file, this Metadata script will extract only relevant data to the current song (the now_playing.song id, artist, title, album, and genre).
NOTE: Azuracast can handle artist, title, album, genre, and album art, which are typically displayed correctly. Also, metadata embedded in audio files uploaded to Azuracast is generally displayed correctly (just the aforementioned fields).
If you've already installed the Let's Encrypt SSL
certificate, the command should look like this to work (add the http
custom port):
or like this:
After saving start_stream.sh and update_nowplaying.sh in the
/home/ubuntu/bin directory, make them executable:
The streaming FFmpeg command will
now run until you end your SSH session. To make it run constantly in the
background, you'll need to use a systemd service. This way, the script runs
automatically on VM boot. Continue reading.
![]()
systemd
Service for the FFmpeg Scriptstart_stream.sh: Paste this inside:
Save and exit Nano (Ctrl+X, Y, Enter)
This command will show you whether the service is active (running), if it's been enabled, and recent log entries to help you with troubleshooting. Example:
If something goes wrong, check logs:
It is absolutely necessary to restart the service after modifying the
start_stream.sh script, but stopping it first is not strictly required.
The youtube-relay.service is configured to run the
/home/ubuntu/bin/start_stream.sh script. When a systemd service
like this is running, it
keeps a copy of the script's code in memory for the currently running process.
If you edit the file on disk:
To make the system use the new code, you must tell the systemd service to
stop the old process and launch a new one, which will read the modified script.
The above command performs the necessary steps:
start_stream.sh
instance) to shut down. /home/ubuntu/bin/start_stream.sh), which reads the latest version
of the script from disk. Important: After you modify the service itself, you must run sudo systemctl daemon-reload
![]()
systemd
Service for the
Metadata Update ScriptProceed similarly by creating another service that controls
update_nowplaying.sh
Paste this inside:
Save and exit Nano (Ctrl+X, Y, Enter)
See if it’s running:
This command will show you whether the service is active (running), if it's been enabled, and recent log entries to help you with troubleshooting.
If something goes wrong, check logs:
This command is necessary after you modify the update_nowplaying.sh script.
But if you modify the service itself, you must run sudo systemctl daemon-reload
![]()
systemd: The Daemon The d in systemd is a common abbreviation
for daemon. A daemon is a background process that runs on a system to perform a
specific task, like managing services, logging, or handling network requests.
systemd is the central daemon that runs from the moment the operating system
starts to manage all other daemons and services on the system.
systemctl: The
Control Utility The ctl in systemctl is a common abbreviation for
control.
systemctl is a command-line utility that you, as a user, use to send commands to
the systemd daemon. You can't directly talk to systemd; you have to use a tool
to do so. systemctl is that tool.
Here is a breakdown of what each command does:
This command tells the systemd
daemon to reload its configuration files. You need to run this command after you
have created or modified a .service file (like youtube-relay.service). This
ensures that systemd is aware of your new service and its settings before you
try to start it.
This command enables your service. When a service is enabled, it means it will automatically start every time your VM reboots. This is an important step for ensuring your YouTube relay runs permanently without needing to be started manually after every system restart.
This command starts your service immediately. It is a one-time command that activates the service for the current session. You would use this to get the overlay script running right after you've created and enabled it.
Used in troubleshooting. For example, when the YouTube relay is not working, although the radio station is running, use both commands, in this correct order (the consumer before the producer of the input):
TIP: You may sometimes even need to reboot the system to clear the cache.
• Check if FFMPEG has started:
It should show the number of the FFmpeg process, something like this:
• You can also check if the scripts are
running by using the ps aux | grep command:
It should show two lines containing the name of each script, something like this:
![]()
Next chapter: Keep Your VM from Being Reclaimed as Idle >