< Prev. |
Next > |
The Traffic
Generator Script ![]() The
Traffic
Generator Service
The
Traffic
Generator Service ![]() Verify
the Traffic Generator Is Working
Verify
the Traffic Generator Is Working ![]() A
Cron Job to Keep Your CPU > 20% (optional)
A
Cron Job to Keep Your CPU > 20% (optional)
As I said in the opening chapter, the "Free Tier" plan imposes some restrictions on how efficiently you are using the resources offered by Oracle. To not be flagged as idle and your VM not be terminated, the minimal thresholds are:
- 20% usage of the CPU.
- 20% of the (1 Gbps) network traffic.
- 20% of the memory (for Ampere shapes only).
Now, how important is it for a "Pay As You Go" user to meet the Idle Policy conditions?
As for the "Free Tier" plan, I think that Oracle will seek all three conditions to be concurrently met, just to be honest. I am saying that because, after 60 days with a "Free Tier" account, my Virtual Machine was automatically terminated...
As for the "Pay As You Go" plan, I think that Oracle's policy is designed to reclaim truly unused resources, not those that are just low on one metric but active on another. For example, a VM with very low CPU utilization might still be actively used if it's processing a lot of network traffic.
After switching to a "Pay As You Go" plan, creating a new VM with an Ampere ARM-based shape, and sending the radio signal to YouTube streaming with FFmpeg, my monitoring tools show the following resource situation:
☑️ CPU at 45% (with FFmpeg), 14% (without FFmpeg)
✔️ Memory at 25% (with FFmpeg), 24% (without FFmpeg) ~ 1,5 GB of RAM
⚠️ Network (with FFmpeg) 100K in, 85K out.
I believe that having met two of three conditions is sufficient. In the worst-case scenario, Oracle will send me an email notification to correct the situation in a day or two. That means that I should do something about the too low network traffic then.
As for now, I am going to prepare an emergency solution for the worst-case scenario. I created a traffic script to ensure a constant network activity over the threshold of 20% of 1 Gbps.
Will I ever need it? Most probably not. Here is what Gemini chatbox says, but remember that, despite its confidence, it is totally irresponsible. If something goes wrong, it will simply apologize.
The Oracle Idle Policy states that an instance must meet ALL THREE conditions to be flagged as idle and subject to reclamation. Since your instance is exceeding the minimum thresholds for both CPU and Memory due to AzuraCast and FFmpeg running, your instance is NOT considered Idle. You don't need to worry about the third (Network Traffic) condition entirely.
1. Halt the Traffic Generator. It is unnecessary overhead and wastes bandwidth:
2. Monitor Your Core Services: Ensure your youtube-relay.service (FFmpeg)
and youtube-nowplaying.service remain active (running). As long as they are
active and using resources (CPU/RAM/Network for the stream), your instance is
safe from the Idle Policy.
Important: Still, the maximal limitations of the "Always free" services remain active for the PAYG plan, and exceeding them will make you pay some money at the end of the month! See the first chapter.
![]()
The
Oracle Ampere VM.Ampere A1.Flex,
offers 1 Gbps bandwidth. As 1 Gbps equals 1000 Mbps, and 20% is 200 Mbps,
that leads us to the threshold of 25 MB per second that must be passed over (1
Byte = 8 bits).
The trick is to repeatedly download a large file, thus generating a consistent network load. By downloading a 100 MB file from the internet at a 4-second interval, the traffic will be exactly 100 MB/4 secs=25 MB per second.
You can use a pure Bash script to
generate network traffic. This is a very simple and effective way to ensure your
Oracle instance doesn't get flagged for low network utilization. The core of the
script will use a command-line tool like wget or curl to repeatedly download a
large file.
You should put the traffic_generator.sh script in the
/home/ubuntu/ directory or a subdirectory like /home/ubuntu/bin/. This is the standard location for user-specific files and scripts. It's
the cleanest and safest place to put a script you created for your personal use.
The -p flag is
important because it tells the command to create any necessary parent
directories. In this case, /home/ubuntu/ already exists, but it's a good
practice.
In more recent Ubuntu versions,
wget is replaced by wcurl. So it’s a good practice to
first install the command:
If not installed yet, first run sudo apt nano install
Use nano editor:
Paste the Bash script from below into the editor. Then save and exit Nano: Press Ctrl+O → Enter → Ctrl+X
Explanation:
A simple and safe way to generate network traffic is by downloading publicly available test files from large, reputable hosting providers. These files are specifically designed for network performance testing and are not intended to be kept, so their use doesn't cause any perturbation.
Recommended File Source: http://speed.hetzner.de
https://nbg1-speed.hetzner.com/100MB.bin is a large
file (100MB) from a major German hosting provider, which is widely used for
network speed tests. It's a binary file, so it doesn't contain any sensitive
information and won't clutter your system with data. It's designed for exactly
this purpose. Using these types of files is the advised method for generating a
consistent and predictable network load for the purpose of avoiding idle
instance reclamation.
From your terminal, run the command:
![]()
To guarantee your traffic_generator.sh script is always
running, you can create a systemd service. This is the standard way to manage
background processes on modern Linux systems like Ubuntu. It ensures the script
starts automatically on boot and restarts if it ever crashes.
First, you'll create a new file named
traffic_generator.service in the /etc/systemd/system/ directory.
1. Open the file in the Nano text editor:
2. Copy and paste the following
content into the file. Be sure to replace with the actual path to your
traffic_generator.sh script:
Explanation:
Description: A simple name for your service. ExecStart: The command that
starts your script. Restart=always: This is the key line. It tells systemd
to automatically restart the script if it stops for any reason. User=ubuntu: Runs the script as the ubuntu user to avoid potential permission
issues.
After saving the file, you'll use a few commands to enable and start the service.
• Reload systemd to recognize the new service (and each time the service is modified):
• Enable the service to start automatically on system boot (only once, at creation):
• Start the service immediately:
• Check the status at any time to confirm it's running correctly:
If
everything is working, the status will show Active: active (running). Your
service is now running in the background and will continue to do so.
Exit with Ctrl+C. Or press Q, to exit the less pager.
• Check the stages of downloading:
The journalctl command should show
continuous "Downloading..." and "Sleeping for 4 seconds" messages.
• Restart (stop+start):
This command is required after modifications in the traffic_generator.sh script
(like SLEEP_TIME value).
• Stop the service:
• Disable the service so it doesn't start automatically on boot:
Note: Using systemctl
is the proper way to manage any service's lifecycle. It gives you full control
and prevents it from restarting unintentionally.
After running the block of commands:
You can verify the
script is active using the ps command:
You should see two processes listed for the script, something like:
Check manually if the downloading works :
curl -o /dev/null --progress-bar http://nbg1-speed.hetzner.com/100MB.bin
Display the downloading duration:
curl -o /dev/null -s -w "Total time: %{time_total}s\n" http://nbg1-speed.hetzner.com/100MB.bin
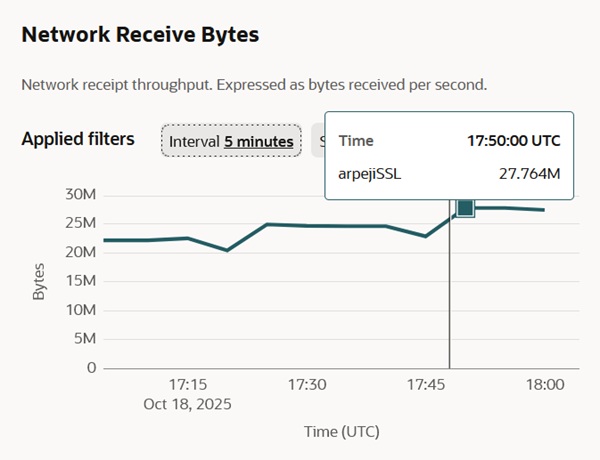
And here is the result, measured by the Monitoring Tool, that indicates a network traffic of 27 MBps, which is above the minimum threshold imposed by the Oracle Idle Policy (25 MB per second).
![]()
The following solution can be applied to any kind of project you make, if your CPU does not consume the minimum required by the Oracle Idle Policy. As for my Azuracast with FFmpeg project, it is not needed.
The key to a successful cron job is to ensure it consumes
enough CPU to pass the 20% threshold without crashing your system by running
indefinitely. A simple yes command is perfect for this purpose.
cron PackageRun the following commands in your terminal to
update your package list and then install cron:
After the installation is complete, the crontab command
will be available, and you can proceed with adding your cron job.
The cron
daemon is a service that runs automatically in the background on your VM. You
don't need to start it manually. All you need to do is add your job to the
crontab file, and cron will automatically pick it up and run it on schedule.
Run this command from your terminal:
• The -e flag stands for
"edit."
• If this is your first time, you might be asked to choose a default editor. Nano is the easiest for beginners.
If nano isn’t installed yet, run:
The editor will open your crontab file. It may contain some commented-out lines with instructions.
Navigate to the very bottom of the file and add your job. It's a good practice to add a comment line to remind yourself what the job is for:
Explanation:
First comes the cron schedule.
• */30:
This means "every 30 minutes."
• * * * *: The rest of the stars mean every
hour, day, month, and day of the week.
timeout 5s yes > /dev/null: This is
the command that will consume CPU.
timeout 5s: This is the most important
part. It tells the system to run the following command for 5 seconds and then
automatically kill it. This prevents the yes command from running continuously
and consuming all your CPU resources, which would lead to a system crash. yes: This command outputs the letter 'y to the terminal infinitely. It's a
simple, reliable way to max out a single CPU core. > /dev/null: Redirects
the infinite output to a null device so it runs silently.
In Nano, press Ctrl + O to save the file. Press Enter to confirm the filename. Press Ctrl + X to exit the editor.
To double-check that
the job is there, you can list your active crontab with this command:
The cron job is now active. It will automatically run the CPU-consuming command every 30 minutes.
If you find that your VM's CPU usage is still below the 20% threshold, decreasing the time between cron job runs is a good strategy.
Your current cron job (*/30 * * * * timeout 5s yes >
/dev/null) runs every 30 minutes for 5 seconds. To increase the CPU usage over
time, you can increase the frequency of the job.
Here is another option for your cron schedule:
Run every 15 minutes:
You can also increase the duration of the command to consume more CPU with each run. For example, to run the command for 10 seconds every 15 minutes, you would use:
You can combine both strategies (increasing frequency and duration) to find the right balance that keeps your VM active without wasting too many resources.
Monitor the CPU utilization with Oracle's Monitoring Tools.
I chose to build a YouTube relay to stream my radio station to an even larger audience within the video platform. The FFmpeg script causes a big increase in CPU utilization (from 15% to 45%) that makes the cron job useless.This value of 45% CPU usage is relatively normal for a 24/7 server.
Still, what if the FFmpeg script stops working and the CPU remains idle?! I created a slightly different cron job that considers that possibility.
Explanation:
• * * * * *: This is the cron schedule. It means the command will
run every minute of every hour, day, and month.
• if ! pgrep ffmpeg >
/dev/null: This is the conditional check.
pgrep ffmpeg: This command looks
for a process named ffmpeg. !: The exclamation mark means "if the previous
command fails." > /dev/null: This redirects the output of pgrep so it
doesn't clutter your terminal or logs. • then ... fi: Standard shell syntax
for an if statement.
• timeout 10s yes > /dev/null: This is the command that
will consume CPU.
timeout 10s: This is the most important part. It tells the
system to run the following command for 10 seconds and then automatically kill
it. This prevents the yes command from running continuously and consuming all
your CPU resources, which would lead to a system crash. yes: This command
outputs the letter 'y to the terminal infinitely. It's a simple, reliable way to
max out a single CPU core. > /dev/null: Redirects the infinite output to a
null device so it runs silently. • &: This runs the yes command in the
background, allowing the cron job to finish its execution immediately.
And here is the verification and fine-tuning of the cron job by manually stopping the FFmpeg script.
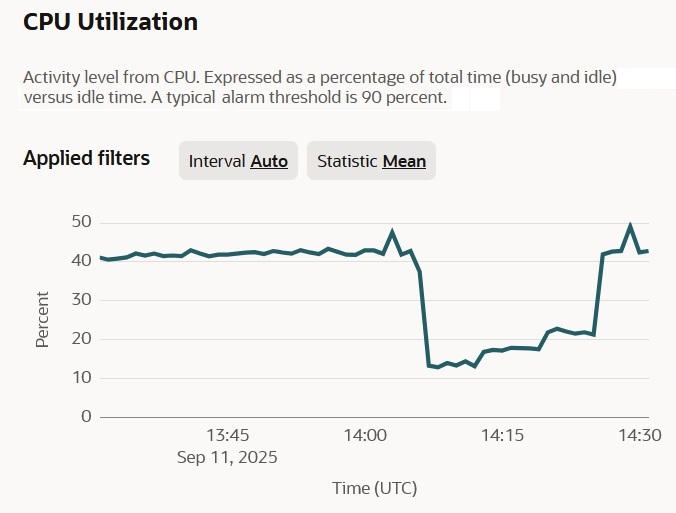
As you can see in the graph, the CPU used less than 20% when the script stopped. I then deployed the cron job to run a simple process for 5 seconds every single minute, and that gave a slight increase, but not sufficient. When I raised it to 10 seconds, that helped exceed the 20% threshold.
Finally, I manually restarted the FFmpeg script, and the "cron job" automatically stopped.
![]()
Next chapter: AzuraCast Issues and Recommendations >