< Prev. |
Next > |
When Creating the VM ![]() Security
Security ![]() SSH
Connection
SSH
Connection ![]() Some basic Linux commands
Some basic Linux commands ![]() Create and Attach a Block Volume
(optional)
Create and Attach a Block Volume
(optional)
After creating the Oracle Free Tier account, you must install the Oracle Authentication mobile app so you can log in. Go to "Google Play" for Android phones or to "App Store" for Apple phones.

Besides the information already given in the previous chapters, I will mention some other basic ones.
• When creating a VM (Virtual Machine), you will be asked what operating system (or image) you would like to use. Normally, you would use a Linux distribution for a server. Especially for a beginner, the Ubuntu distro is recommended. That's what I did.
For the Intel and AMD shapes, I preferred the Canonical minimal Ubuntu, for not being cluttered with useless apps, which is ideal for servers. Yes, I have to install each application individually, but that’s a very simple task in Linux.
Note: The Ubuntu minimal image is not working with the Ampere A1 Flex shape.
• If you are at your first VM within your Oracle Cloud free account, you will have to create a new Virtual Cloud Network (VCN) and a new subnet. If you are at your second VM, you may choose an already existing VCN and subnet.
• Also, you will have to ask Oracle to create a private-public key pair and immediately download the private key for SSH connection. Or you may add an existing pair that you created before.
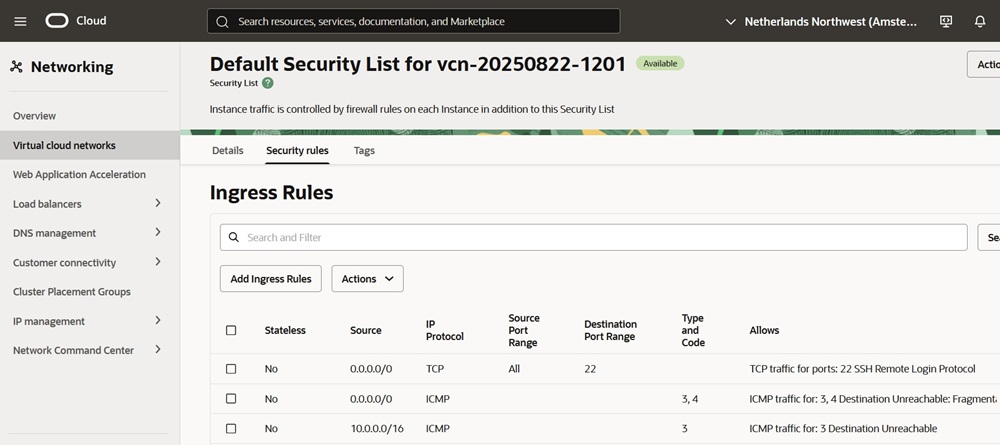
After creating the VM instance, you should define some security rules. In Oracle Cloud Infrastructure (OCI), the Ingress Rules you set in the Virtual Cloud Network (VCN) are a type of Firewall.
1. Navigate to Networking > Virtual Cloud Networks (VCNs).
2. Click on the VCN your VM is in, then select Subnets.
3. Click on the subnet your VM is in, then click on Security.
You will see a Default Security List, where port 22 (for SSH) is already listed. See the screenshot below.
4. Back in the Subnet's Security tab, create a new custom list by clicking on "Add Security List" and giving it a name.
5. Then click Add Ingress Rules and enter the following details for the stream port:
You should also definitely add the following Ingress Rules:
Do not set any Egress Rules for this project, thus allowing your VM to access the internet, send emails, or make API calls.
Here is how my security list looks.
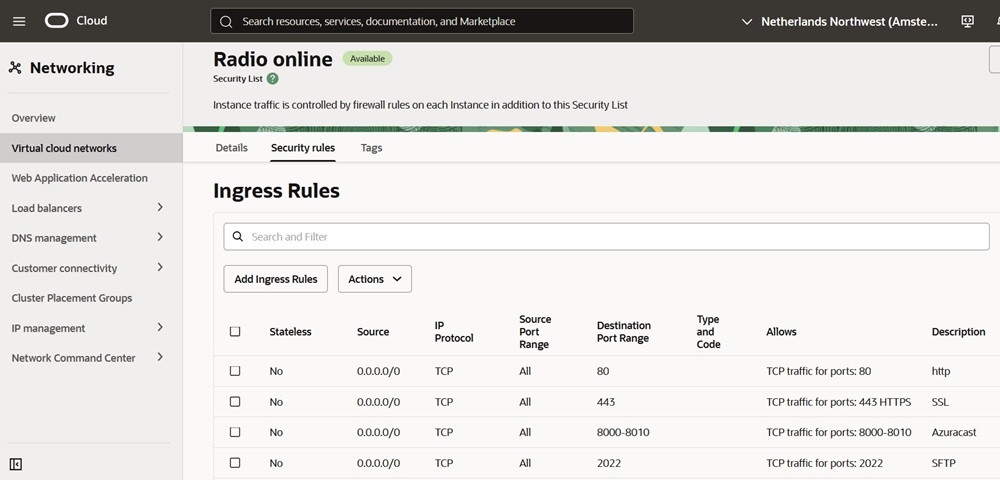
Incoming ports 22 (for SSH), 80 (for HTTP), and 443 (for HTTPS) are standard for any type of project.
NOTE: If you reuse an old VCN with its IP but create a new subnet, double-check that the same security list exists on both. The rules for a subnet are a separate configuration from the VCN's main security list. That is the reason why we created the custom list inside the Subnet and not inside the VCN details page, so that the VCN automatically takes the new list as its own. That wouldn't have happened vice versa, and you should have added the VCN's security list to your subnet, too.
![]()
After creating the Oracle VM, you will have to connect to it via a safe method. The best way is by using SSH (Secure Shell protocol). I am a Windows user, so I use the PowerShell command line. Right-click on the Windows icon in the taskbar and choose "Terminal (admin)".
I usually copy the following command and paste it into the Terminal:
Explanation:
• C:\Users\petre\Downloads\ssh-key-2025-08-28.key is the path
where I store the SSH private key that I got from Oracle at the moment of
creating my VM. (Notice “petre” is my Windows username.)
NOTE: Be very careful to download the Private key immediately when you create the public-private pair keys, because you cannot retrieve it anymore. If you lose your Private key, you can only erase the VM from your Oracle Cloud account interface and make a new one!!! You don’t need the Public key, as it is already stored in the Oracle credentials, unless you want to reuse this pair of keys later in another project.
• ubuntu@134.98.152.181 is my automatically assigned username and my server
IP.
For this command to work in Windows, you must first change permissions for the private key file. Use the command below and change the path and Windows username in accordance with your own. Let the rest of the command intact!
To verify it worked, right-click on the .key file, Properties, and go to the Security tab. You should only see your Windows local username with full control. It is enough to do this operation once, and the Windows OS will remember it.
If you copy the SSH private key file to another location, take care to also change the permissions of the new file!
Explanation:
The reason for this command is that SSH clients will refuse to use a private key if its permissions are not secure enough. This is a critical security feature to ensure that only you (the Windows user) can access your private key.
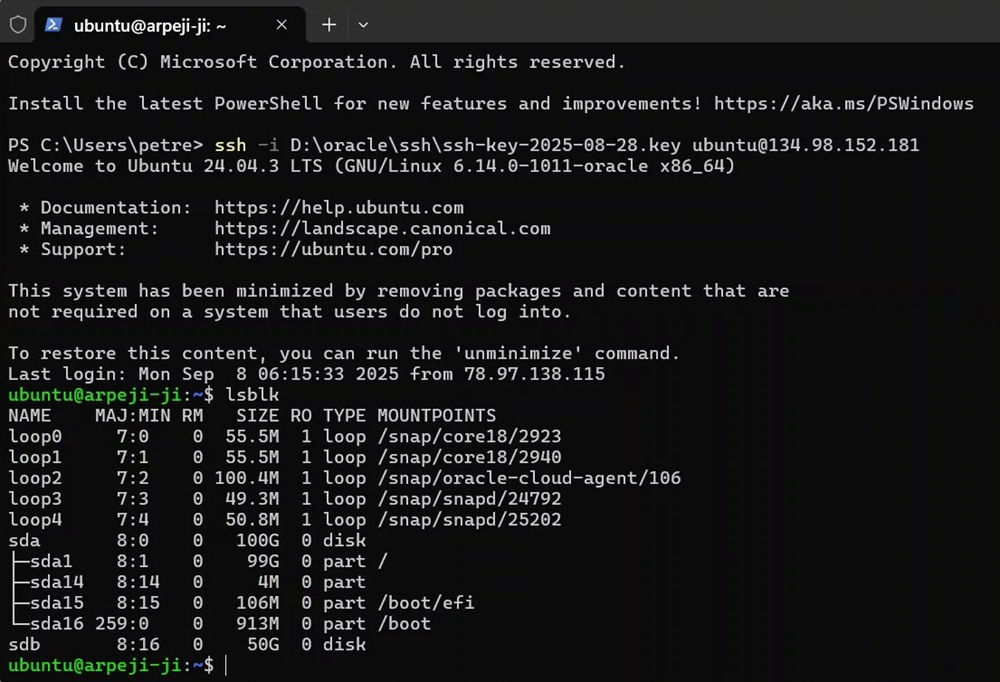
Here is a snapshot of the terminal after a successful SSH connection.
Explanation:
• ‘ubuntu’ is the Linux local user directory, and ‘arpeji’ is how I named my VM. The blue ‘~’ sign shows we are now in the default user ‘ubuntu’ directory.
• The Linux commands will follow the ‘$’ sign.
Note: As a Windows user, be aware of this difference. When you are in the Windows environment, the backslash '\' is used to describe a path. In Linux, we use the slash '/' for that, while the backslash '\' is used in scripts, allowing you to break long commands into multiple lines for better readability without affecting their execution.
Important: In Linux, the '\' must be the very last character
on the line. If you were to add any other character after the '\', such as a # for
a comment, the line continuation would fail.
![]()
I will cover some of the most basic Linux commands and structure.
The first time you connect to your Ubuntu server via SSH, you are driven to the "ubuntu" folder/directory, which is a subdirectory of the "home" directory. (The directories/folders have a tree structure as in Windows OS.)
Here you can launch the command ‘ls’, which lists all files and folders that
exist there. Type ls, then press the Enter key. At the beginning, there will
be nothing to show. In my case:
It has listed the 'bin' subdirectory, which I made within the user directory, called 'ubuntu' by default. Note the blue '~' sign before the '$', which is an equivalent for the user directory (i.e., 'ubuntu').
You can add a "flag" to
this command, which gives more information: ls -la or ls -al (mind it is a
hyphen or minus sign, not a dash ( a
longer hyphen)! This command will show all files,
including the hidden ones (those starting with a dot '.')
TIP: You can always ask for help on any command simply by typing --help. For
example: ls --help
If you want to navigate to another folder/directory, use the cd command
(change directory) like 'cd /path/to/folder’. This is an absolute path, starting
from the root directory (first ‘/’ sign).
For example, if you are in the
"home" folder, cd /var followed by the Enter key will get you directly within
the "var" folder, which is also a direct subfolder of the root ('/').
Also, 'cd subfolder_name' will get you from the parent folder to a subfolder.
If you want to get back to the parent folder, use the cd .. command
(cd space dot dot).
For
example, here we go from the user directory (‘~’ or ‘ubuntu’) to the parent
directory (‘home’), and list all in detail, which are subfolders ‘opc’ owned by
the opc user, and ‘ubuntu’ owned by ubuntu user, plus ‘..’ the parent directory
of /home, which is the root directory (/) and ‘.’ the current directory (home),
owned by the root user.
We may want to go to the root ('/') and list all its subdirectories.
If you want to go to your user directory at once, type cd ~ and you’re back
to your working folder, “ubuntu”. Or even simpler, simply type cd.
TIP: Get more info with cd --help.
You can check in which folder you are at any time by watching the prompt structure (on the left side, before the '$' sign). The '~' sign is a shortcut for the user/working folder (in our case, the 'ubuntu' directory).
Alternatively, you can use the pwd command.
Another common command is ‘sudo’. You will need to use ‘sudo’ for any command that modifies the system or accesses protected areas. So ‘sudo’ gives some temporary elevated privileges.
Tip: Every time a command doesn't work, first try putting sudo before.
You don’t have to use ‘sudo’ if you’ve already given yourself full permissions for that specific folder you are working in. For example:
• makes the azuracast folder, where the AzuraCast files will be installed.
• changes the owner and group of the
'azuracast' directory and all its files and subfolders to 'ubuntu'. So now you
can launch commands within that directory without sudo.
TIP: More info by typing sudo --help.
In Linux, most files are text files.
You can easily display their content with cat. For example:
If the directory contains files:
• rm: The standard command for removing files.
• -r: The recursive flag, which
allows rm to delete directories and their contents.
If the directory is
empty:
• rmdir: Stands for "remove
directory." It will only work if the directory is empty.
Another important command is Ctrl+C, sometimes written ^C. When you want to instantly interrupt and terminate a program that has been executing for too long or when you are not given the usual prompt, press Ctrl and C keys simultaneously. Then the default prompt should appear, ready for your commands, something like:
When pasting Linux commands from Office Word files, be careful to use hyphen - and NOT dash – ! Dash (a sort of long hyphen) will make commands not work. Compare their length here: - –, although you will see no difference in Terminal, and that can cause you a lot of headache!
That is because Microsoft Word
often auto-corrects - to – by default. The solution would be to go to Word
Options > Proofing > AutoCorrect > AutoFormat As You Type, untick 'Hyphens with
dash'. Do the same in the AutoFormat tab as well.
After connecting to your Linux operating system, the first thing you should always do is update your system. Repeat this operation weekly for maintenance.
Run the following commands:
• sudo apt update: This command downloads the latest package information from
the repositories.
• sudo apt upgrade -y: This command upgrades all the
installed packages to their latest versions.
The -y flag automatically says "yes" to any prompts, which is handy for non-interactive updates.
Here is a partial screenshot, as an example.
![]()
As I said, the storage quota that I can use freely is 200 GB of block volumes (Boot plus Block). So I will use another 50 GB for a separate Block volume. I will leave the rest free, just in case.
Anyway, this operation is optional for the beginner, and its purpose would be to have a separate backup AzuraCast file in case I want to reinstall it by keeping the old Docker installation (this is a matter of troubleshooting and learning Linux stuff for intermediate users). See the chapter "AzuraCast backup"
I already have a full VM backup, so it is much simpler to create a new VM from this backup file, having all the software already in place.
Of course, this block volume of 50 GB can also be used to store files for other purposes (archiving, etc).
I explained this operation in my introductory video, also.
1. Log in to Oracle Cloud Console.
2. Navigate to Menu > Storage > Block Storage > Block Volumes.
3. Click Create Block Volume.
4. Choose:
5. Click Create.
1. Click on your newly created block volume (e.g., azuracast-media)
2. Go to the "Attached instances” tab.
3. Click Attach to instance
4. Choose “Paravirtualized”
5. Select your VM instance
6. Select device path
/dev/oracleoci/oraclevdb.
7. Click Attach
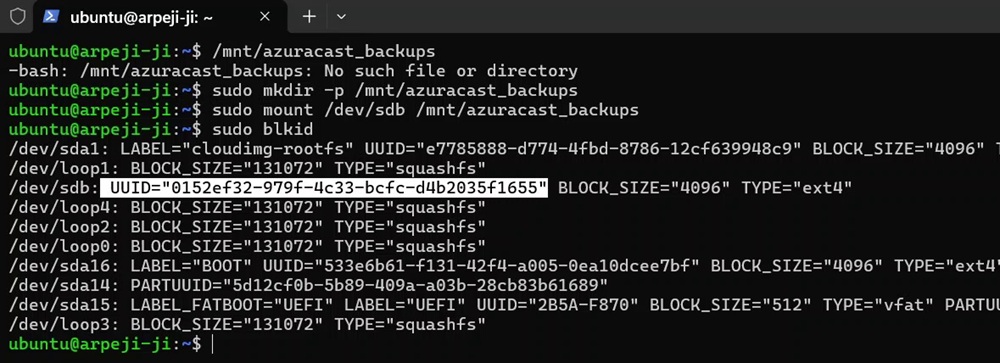
Connect to your VM via SSH.
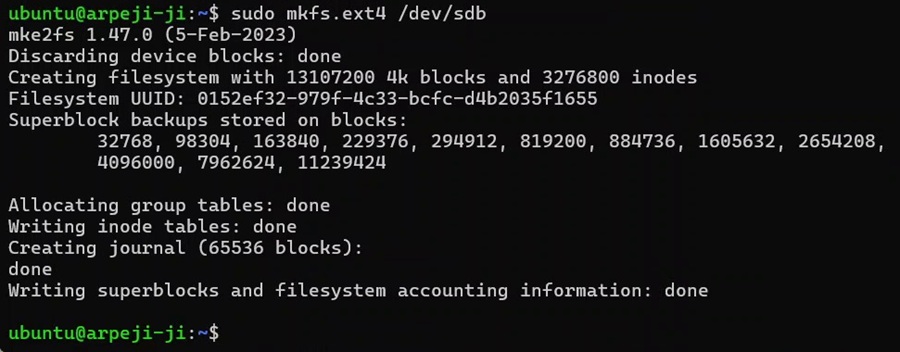
List block devices with the simple lsblk command, and identify the boot volume
sda,
and your new device sdb at the bottom.
If the nano editor is not installed on your system, first run
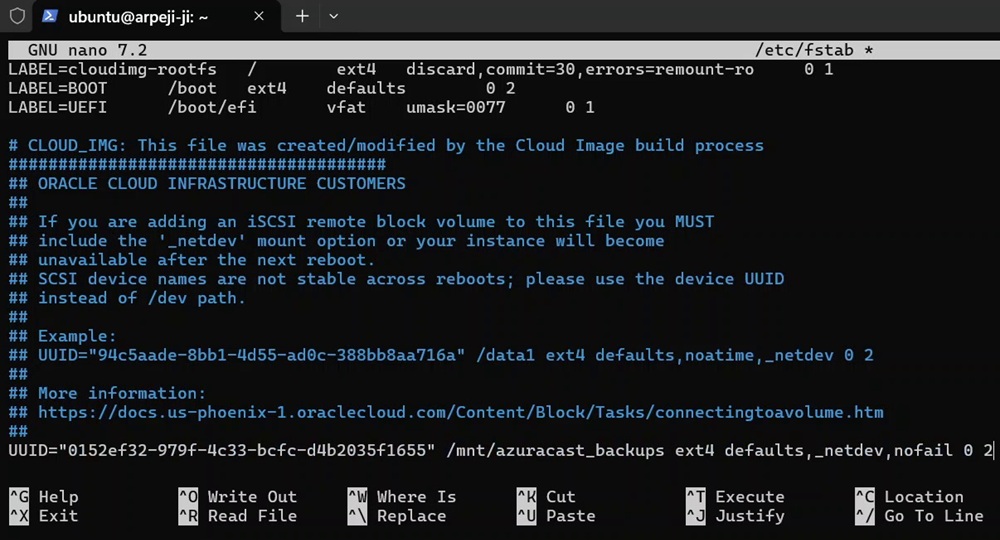
Edit the /etc/fstab file with the nano editor.
Navigate with the down arrow to the bottom of the file.
Add a line to permanently mount the block volume to the desired folder. Use the UUID found in step 6. In my case, the line is:
UUID="0152ef32-979f-4c33-bcfc-d4b2035f1655" /mnt/azuracast_backups ext4
defaults,_netdev,nofail 0 2
Finally, press CTRL+X to exit nano. When asked if to save, press the Y key. Keep the same name of the file? Press the Enter key.
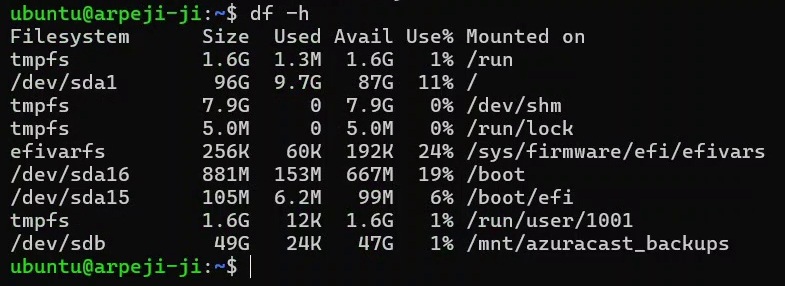
Now the 50 GB
block volume can be safely used for any purpose you like, not just AzuraCast
backup, by simply navigating to the /mnt/azuracast_backups folder.
Don’t forget to get full permissions for that folder:
![]()
Next chapter: Azuracast Installation >